Chocolate Peanut Butter Bombes

Baked: April 4-5, 2020

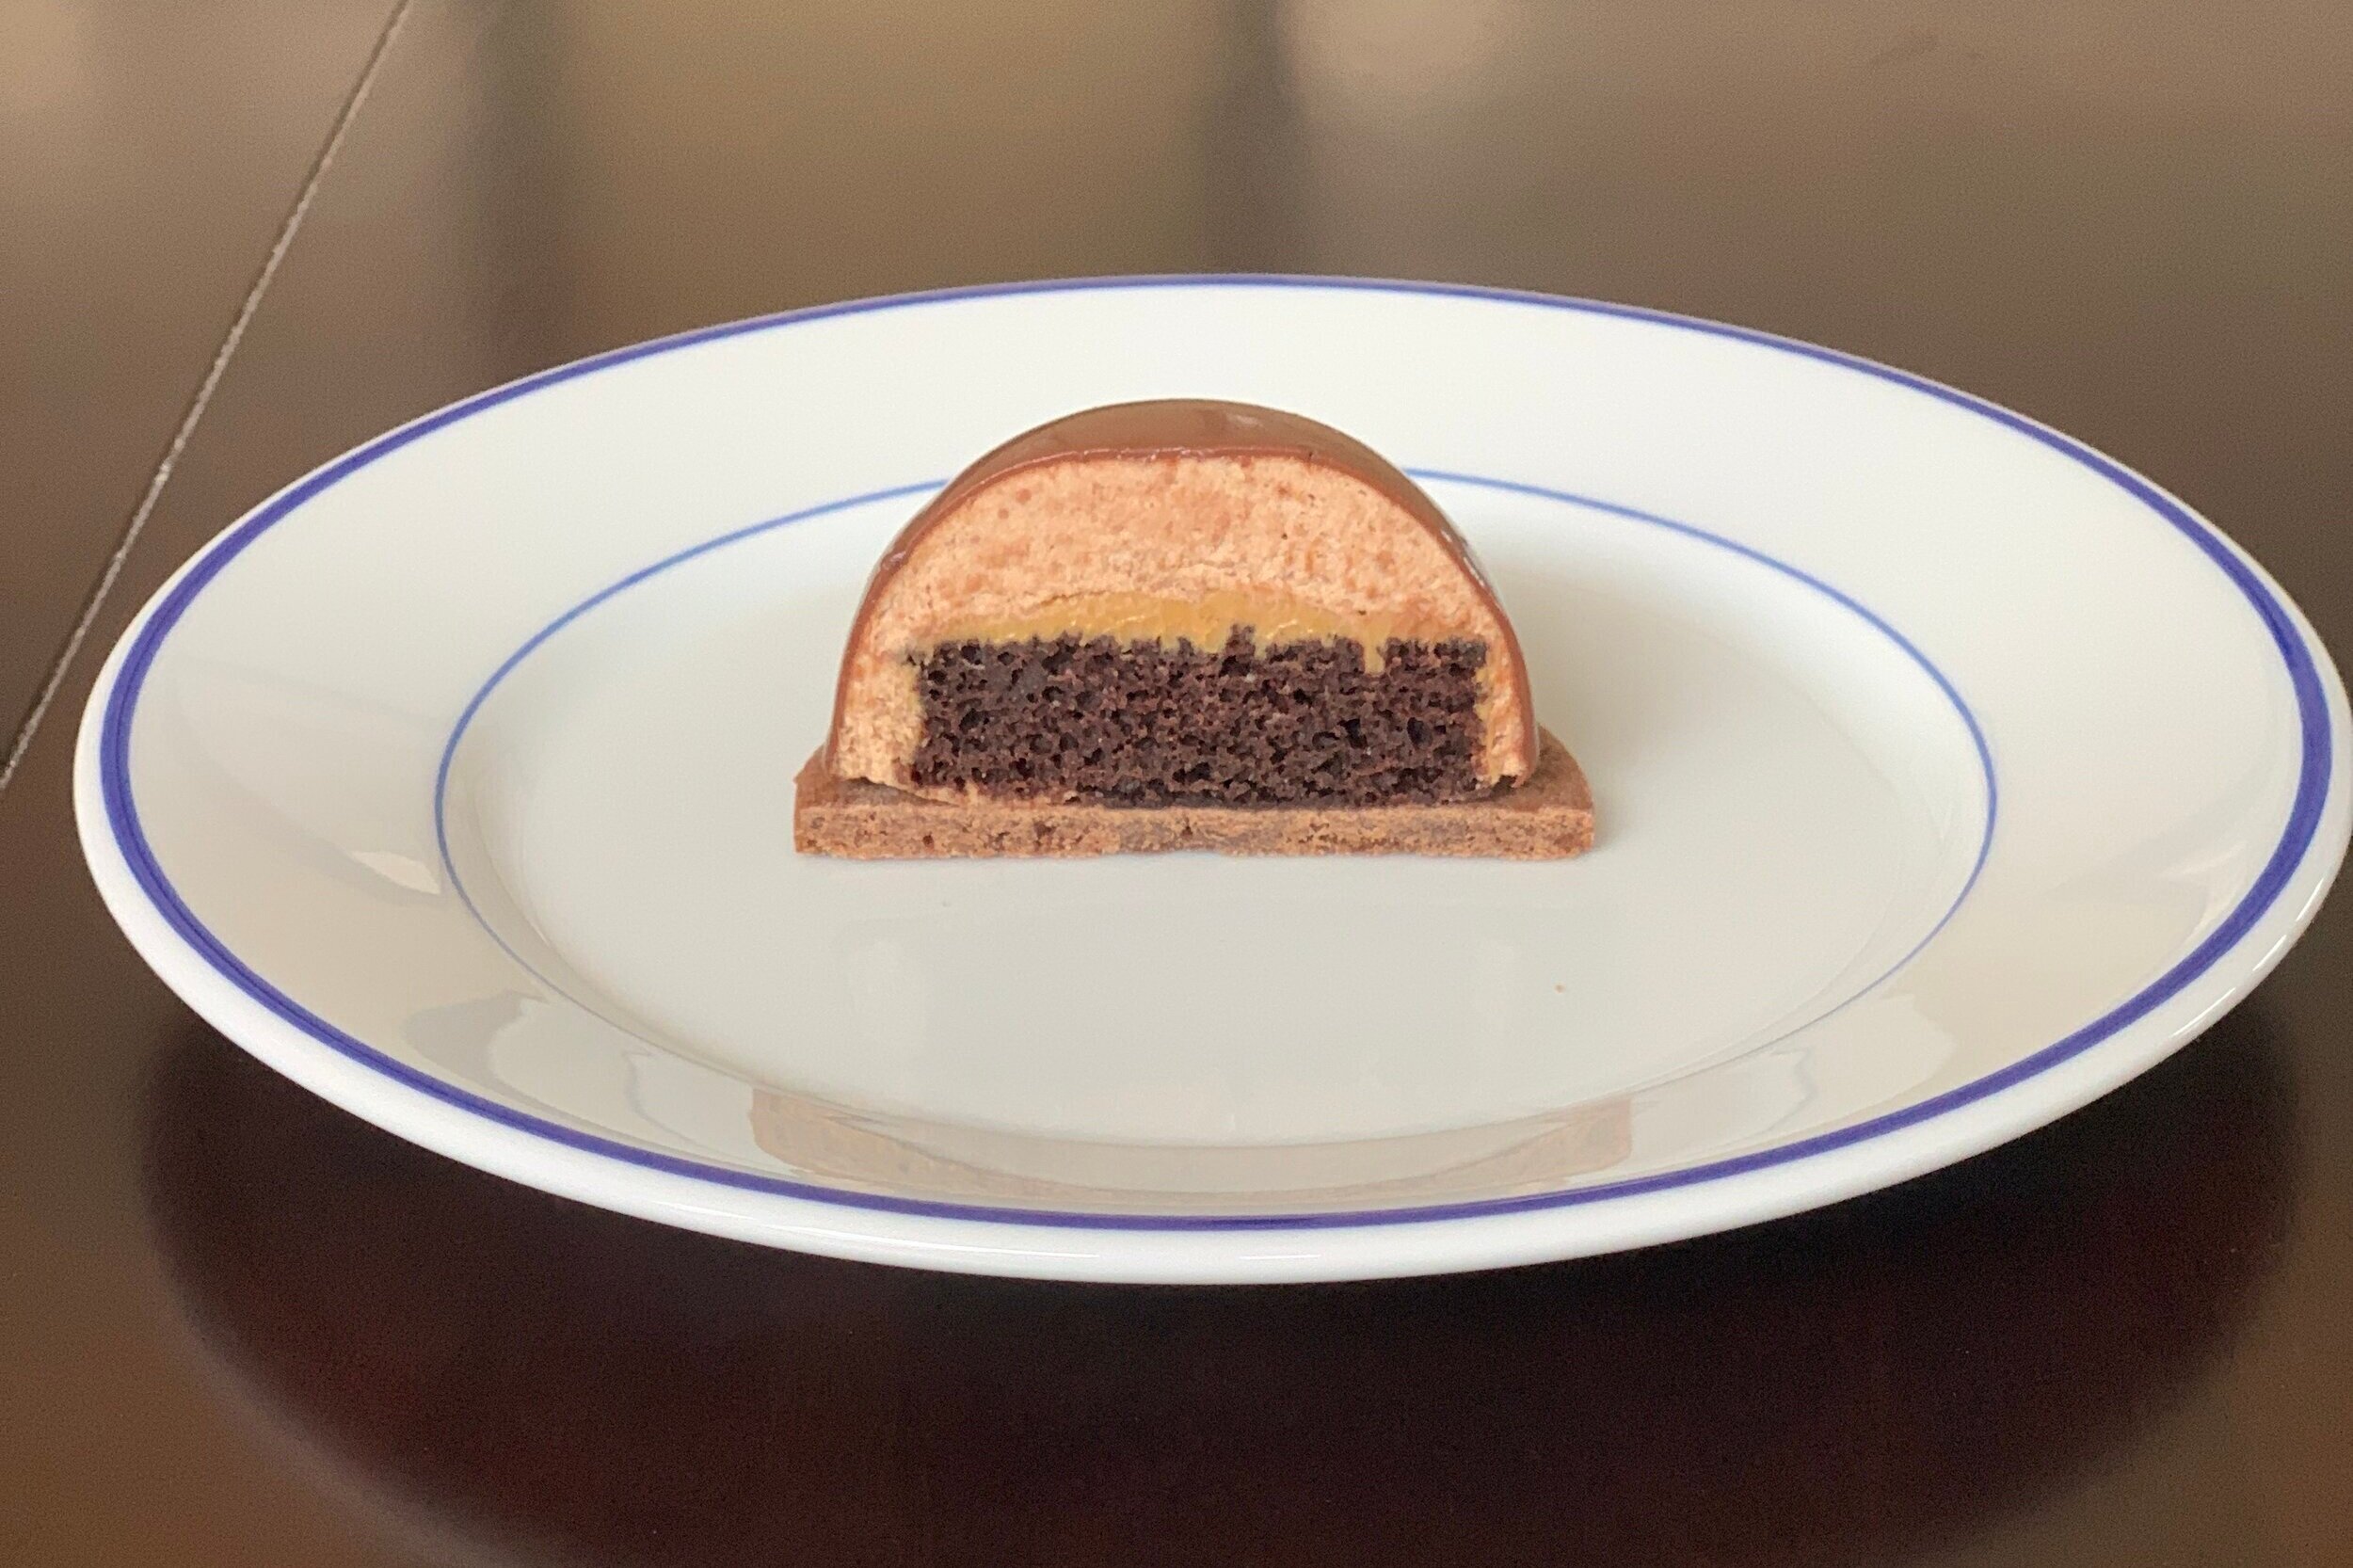
As we continue to shelter-at-home to flatten the curve and fight COVID-19, I continue to use this as an opportunity to bake. My selection of bakes has grown more ambitious as I have more and more time to spend on them! Thus this week I am making Chocolate Peanut Butter Bombes. These small, hemispherical treats are made up of devil’s food cake, peanut butter, and chocolate bavarian cream, enrobed in a shiny chocolate coating and served on a chocolate wafer. You definitely need to eat these with a glass of milk!

While we have to keep our distance, it is still nice to be able to connect with family on video chat or through a window during this time. After finishing these treats, I drove to my brother’s house to leave a few on his doorstep for him and his family. We were able to chat for a few minutes, him on the porch and me down the driveway. I later found out that the next day my seven-year old niece wrote in her homework assignment, “I want to learn how to make bombs like my aunt.” While yes we are all going a little stir-crazy, no I am not making bombs. Well I am… but only the tasty chocolate kind!

IMG_6709.jpg

You DA BOMB for staying home to flatten the curve!

Let’s get started!

There are many steps to creating the Chocolate Peanut Butter Bombes:

  1. Make devil’s food cake and prep the cake rounds.

  2. Make chocolate Bavarian cream

  3. Prepare the silicone molds

  4. Make cookie wafers

  5. Make the chocolate glaze, enrobe the bombes and assemble

Step 1: Make devil’s food cake and prep the cake rounds

The original recipe for Devil’s Food Cake was scaled to make six 8” rounds. Since I would later need to cut out small rounds of cake, I thought it would be easier to just make a rectangular sheet cake and scaled the recipe by surface area.

First, I combined eggs, butter, water and vanilla extract until smooth. I then slowly added in the sifted dry ingredients (sugar, flour, baking soda and baking powder). I continued to mix until the mixture was smooth. Next, I added cocoa powder and again mixed until smooth. As you can see, some of the cocoa escaped! Before baking, I poured the batter into a 9x13” baking pan lined with parchment paper.

IMG_6609.jpg
IMG_6610.jpg
IMG_6611.jpg
IMG_6612.jpg

Step 2: Make chocolate Bavarian cream

I’ve made chocolate Bavarian cream before so I will spare you all the details here. If you want to see that description, check out my post when I made Peanut Butter S’mores Cake.

Step 3: Prepare the silicone molds

To make the bombes, hemispherical silicone molds are filled with Bavarian cream and then rounds of chocolate cake covered in peanut butter are pushed into the Bavarian cream. This means that I first need to cut small rounds of cake from my sheet of devil’s food cake. The cake was quite tall, so I first leveled the cake to only be about 1” thick. There was a lot of cake scraps as a result. I froze these to potentially use later on for recipes that call for cake crumbs. Then using a 2” round cutter, I cut twelve disks of cake.

IMG_6614.JPG
IMG_6616.JPG

Next, I piped a small layer of creamy peanut butter onto the top of each small cake disk.

IMG_6630.JPG
IMG_6632.jpg
IMG_6634.jpg

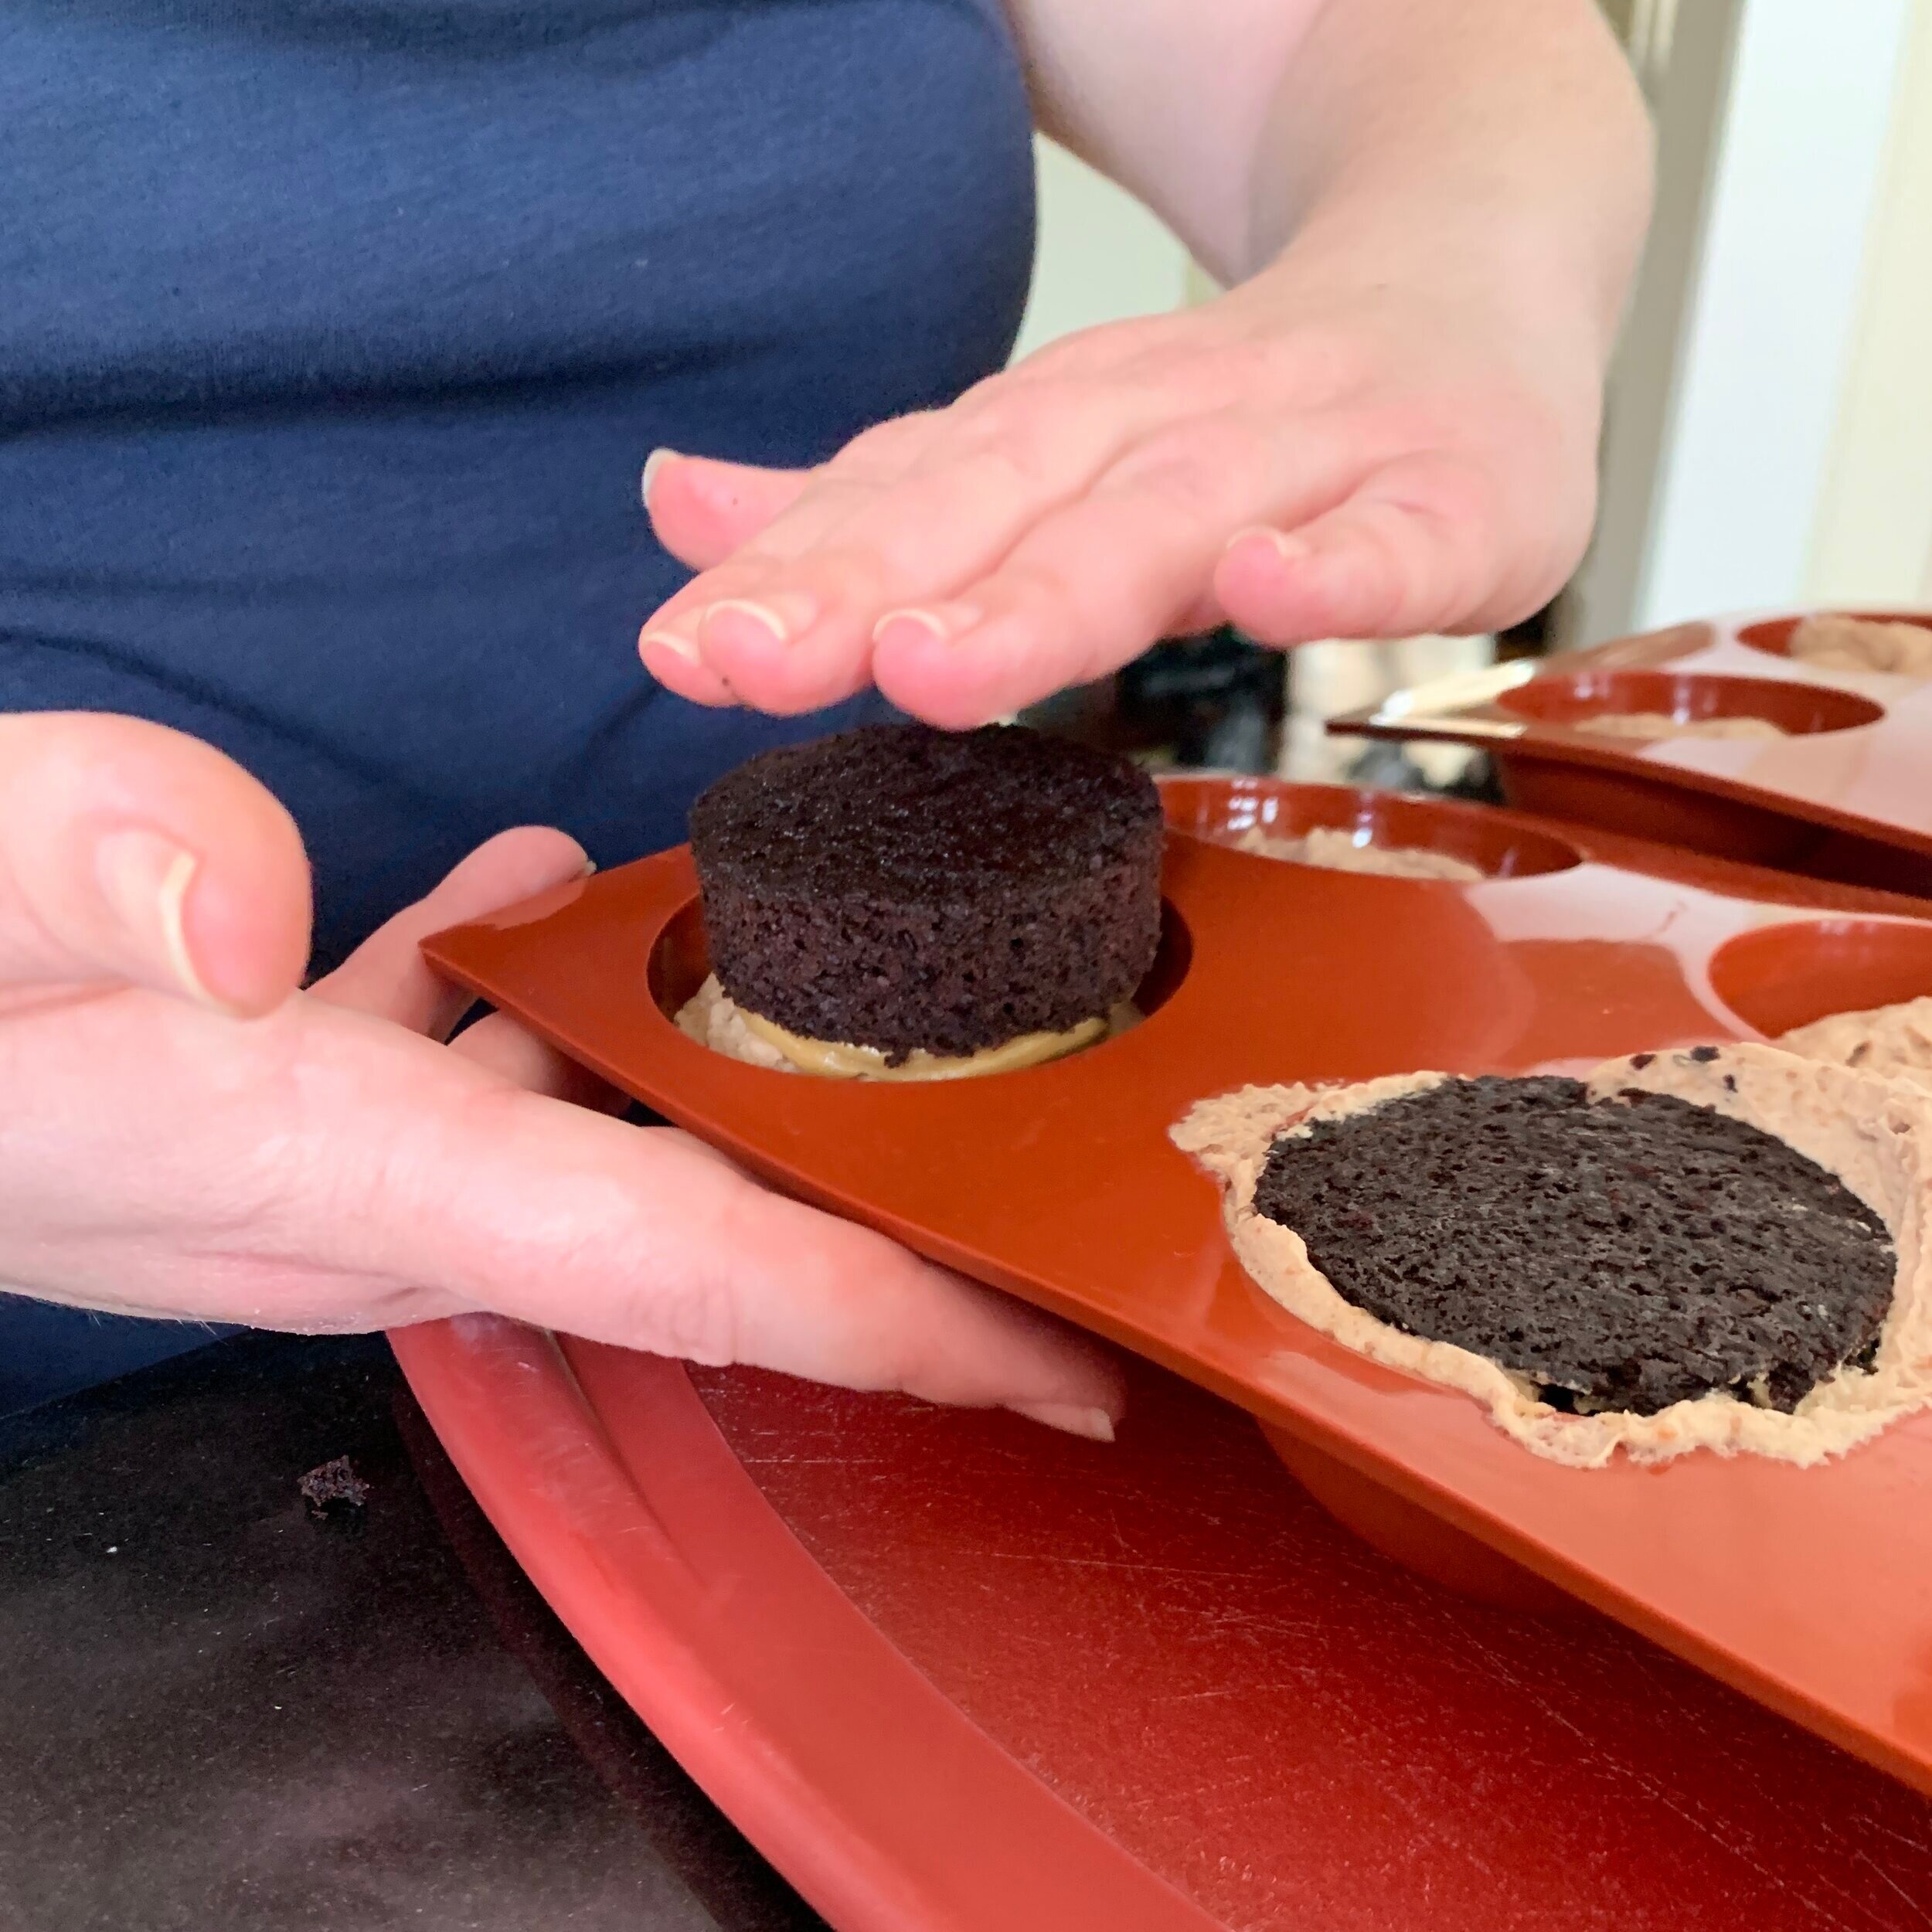
To assemble the molds, I first piped chocolate Bavarian cream into each mold until it was filled about a half an inch from the top. Then, I flipped each cake round upside down, pushing the peanut butter-covered side into the chocolate Bavarian cream. I kept pushing until the cake round was flush with the top of the mold and wiped away any excess cream that came up. The Bavarian cream has gelatin in it, so it is important to have all your other pieces ready to go before you make the cream. You don’t want the gelatin to set up before you get the chance to assemble the molds. I then froze these molds overnight.

IMG_6639.jpg
IMG_6641.jpg
IMG_6652.jpg
IMG_6655.jpg
IMG_6661.jpg

— Next Day —

Step 4: Make cookie wafers

The cookie wafers for this bake are made from the same dough I used last time to make the Pecan Passions. Please see that post for more information on making that dough. I simply used a 2.5” round cutter to cut small circles and baked until firm.

IMG_6673.JPG

Step 5: Make the chocolate glaze, enrobe the bombes and assemble

Now that the bombes are fully frozen and set, they can be unmolded and enrobed in a shiny chocolate glaze. To make the glaze, heavy cream, milk and corn syrup are heated in a saucepan and brought to a boil. This hot mixture is then poured over a mixture of coating chocolate (pate a glacer) and dark chocolate. I first stirred to form an emulsion and then used a hand blender to fully emulsify it. Next, I unmolded each frozen bombe and set them on a wire rack set over parchment paper. After the chocolate had cooled to 95 degrees F, I enrobed each bombe in the chocolate. The bombes are still frozen at this point, so the chocolate glaze sets quickly to cover the bombes.

IMG_6677.jpg
IMG_6680.jpg
IMG_6685.JPG
IMG_6687.JPG

After letting the chocolate set for a few minutes, I used a spatula to transfer each bombe to sit on top of a cookie wafer. I was shocked by how shiny the chocolate is! In the last picture below, you can actually slightly see the reflection of me taking the photo with my phone!

IMG_6688.JPG
IMG_6689.JPG
IMG_6702.JPG

And there you have it! Chocolate Peanut Butter Bombes!!

IMG_6706.jpg
IMG_6709.jpg

Lessons Learned:

  • The silicone molds that I used rest freely on table. This meant that after being filled with the Bavarian cream / cake and frozen, they formed a very slight flat surface at the bottom of the hemisphere. Perhaps a different type of mold that ensures the hemispheres are suspended would prevent this.

  • I had a hard time really pushing the cake all the way into the molds until they were flush. Perhaps using a slice of cake that is a bit thinner or more narrow would have made this easier. An alternative would have been to freeze the cake rounds and peanut butter before pressing into the molds. This would have created a stiffer surface to push into the molds as well as ensure the layer of peanut butter remains even.

  • While enrobing the bombes with chocolate, I missed a few of the edges and had to go back over with more chocolate. If you do this too late, it creates an extra layer of chocolate in that spot and the coating is uneven. As I went along I got much better and the technique to make sure I was covering all parts of the bombe.

  • The instructions tell you to place the bombes on the wire rack before enrobing with chocolate. However, the wire rack causes the bottom of the bombes to look uneven and it is also quite difficult to pick up and transfer to the cookie wafers. If I were to do this again, I think I would place the bombe on a cookie wafer first and then place the full assembly on a can or other small stand before enrobing. This way the chocolate flows over the sides of the dessert rather than over the sides and sticking to the wire rack. Furthermore, enrobing the bombe and cookie wafer together makes the dessert feel like a single unit.

Until next time…

Pecan Passions

Baked: March 29, 2020

Photo Credit: Daniel Beauboeuf

As we all huddle at home to fight COVID-19, many people are turning towards activities they can do indoors to pass the time or keep the kids occupied. Many are turning to baking, causing a run on eggs, butter, and yeast, among other baking needs, at the grocery store. I am extremely embarrassed to admit that I actually paid $15 for a dozen eggs to be delivered from Whole Foods for this bake, just because it was the only way I could get eggs! Although this is a stressful time, it is a fantastic excuse to do more baking for this blog… but perhaps I am now baking too much? As of this writing, I am actually backlogged on blog entries! It turns out it takes less time to make and eat the treats than to write up these posts. What’s more, now I have no one to give these treats to. I used to force my husband to take them to work and feed his team, so now I have to get creative. This week, I made Pecan Passion tartlets and dropped a few off at a friend’s house just so I wouldn’t eat them all.

IMG_6587.jpg

PE-CAN survive through COVID-19!

Let’s get started!

There are multiple steps to making Pecan Passions:

  1. Bake the tartlet shells

  2. Make the soft caramel filling

  3. Make the soft ganache filling

  4. Assemble the tartlets

Step 1: Bake the tartlet shells

The crust of these tartlets is chocolate short dough which is made of simple ingredients of flour, cocoa powder, butter, sugar, vanilla extract and eggs. The first step is to cream the butter and sugar until it is smooth and light in color. Next, I gradually added the vanilla extract and eggs, blending completely after each addition. Finally, I added the sifted flour and cocoa powder all at once and mixed until it just came together.

IMG_6391.jpg
IMG_6396.jpg
IMG_6402.jpg
IMG_6404.jpg

I then turned the dough out onto a floured surface to bring it together and wrapped it tightly in plastic wrap. I chose to wrap it in a rectangular shape so it would roll more easily in that shape later in the process. I refrigerated the dough for at least one hour before using.

IMG_6420.jpg
IMG_6432.jpg
IMG_6439.jpg

After refrigerating the dough for an hour, I rolled it out to a 1/8 inch thick rectangle and cut out pieces of dough to lay into the tartlet shells. I initially placed each small piece into individual shells, allowing the slack at the sides to fall over on top of the center of the dough.

IMG_6446.jpg
IMG_6452.jpg
IMG_6454.jpg
IMG_6456.jpg

Working one by one on each tart, I folded the slack dough back up the sides of the tartlet pan and gently pushed the dough into each crease. When finished, I rolled the rolling pin over the top of each tart to pinch off excess dough. Admittedly, this worked well in the past with a very large tart pan, but with these small 4 inch tartlets, working a knife sequentially around the edge worked much better.

IMG_6459.jpg
IMG_6470.jpg
IMG_6471.jpg

These small tartlets require full blind baking prior to filling. For a refresher on the blind baking process, see by last blog where I made a Zesty Lime Tart.

IMG_6478.jpg
IMG_6479.jpg
IMG_6486.jpg
IMG_6490.jpg

Step 2: Make the soft caramel filling

Caramel is notoriously difficult to make. In fact, this recipe calls for making the caramel without adding any water, which made me quite nervous as it comes with a higher risk of burning the caramel. That said, adding water comes with its own risk of crystallizing the sugar and having to start over. In this time of coronavirus “shelter at home,” I have limited supplies so I decided to risk burning the caramel over having to start over completely. First I added the sugar and lemon juice to a saucepan, heating until the sugar was dissolved. I tried not to disturb the sugar except to slightly combine by pulling sugar at the edges of the pan towards the center.

IMG_6506.jpg
IMG_6508.jpg
IMG_6519.jpg
IMG_6527.jpg

Meanwhile I heated the heavy cream to prepare for combination with the melted sugar. Once the sugar was a dark amber / copper color, I removed it from the heat and slowly added the hot cream, continually whisking as I added it. Lastly I added butter and continued to stir until it was melted and fully incorporated.

IMG_6533.jpg
IMG_6536.jpg
IMG_6539.jpg

Step 3: Make the soft ganache filling

The day before these other steps, I measured out dark chocolate in a heat-safe bowl. After heating up heavy cream on the stove, I poured it over the dark chocolate pieces. After letting it stand for one minute, I gently combined the chocolate and heavy cream until smooth and strained it into a separate bowl.

The next day, I took the cooled ganache and added heavy cream on top. I whipped this mixture with a whisk attachment until it resembled a chocolate mousse.

IMG_6378.jpg
IMG_6380.jpg
IMG_6546.jpg

Step 4: Assemble the tartlets

The tartlets are layered as follows: caramel, pecans, ganache, caramel, pecans. I first spooned in a layer of caramel, tilting the tartlet from side to side to ensure even coating. I used a scale to make sure I was adding the same amount of caramel to each tart and would have enough left for the other tarts and layers. I next added toasted, chopped pecans to this layer. After allowing the caramel and pecans to sit for a few minutes, I spread a layer of ganache on each tartlet and placed them in the freezer to set. As the tartlets were freezing, my remaining caramel started to stiffen. Before moving on to the next step, I lightly heated the caramel to return it to a spreadable consistency. I then added second thin layer of caramel on top of the ganache, followed again by chopped pecans.

IMG_6550.jpg
IMG_6552.jpg
IMG_6558.jpg
IMG_6560.jpg
IMG_6563.jpg
IMG_6572.jpg
IMG_6573.jpg
IMG_6574.jpg
IMG_6577.jpg

And there you have it, Pecan Passion Tartlets!

IMG_6585.jpg
IMG_6589.jpg

Lessons learned:

  1. As I rolled out my chocolate short dough, it kept cracking. I think I incorporated too much flour as I was rolling it out.

  2. I ended up only having enough dough to cut out five circles for the shells, when I had intended to make six. However, I had a piece of rolled dough large enough to cover the base of the sixth tartlet pan and then I used scraps to piece together the sides. This actually worked remarkably well and I would say that was my best looking tartlet shell!

  3. I did slightly burn the caramel by having it on the heat for too long. Next time, I will use a candy thermometer to check the temperature rather than relying on how the caramel looks to know if it is done.

    Until next time…

Zesty Lime Tart

Baked: March 7, 2020

Happy Pie Day! I have to admit that this year my inspiration for my Pie Day bake came from a pretty grim place. If you are reading this post in real time, you likely know that we are currently experiencing an outbreak of the novel coronavirus around the globe, including in my back yard. Since the virus is affectionately called “Corona” for short, some have started to ponder whether it is Corona beer that is responsible for the outbreak. Amazingly, according to this article, 16% of Americans are currently confused about whether Corona beer is related to the coronavirus!

Well, what is the one thing that always goes with a Corona beer? A lime of course! So cheers to you coronavirus, may you fall victim to my endless lysol wipes and hand sanitizer. In the meantime, let’s enjoy a Zesty Lime Tart!

IMG_6270.jpg

“Lime” feeling good about this bake.

Let’s get started!

Step 1: Make the dough for the crust.

First I creamed together the butter and sugar until the mixture was smooth. Then, adding a small portion at a time, I mixed in the vanilla extract and eggs. Once fully combined, I turned off the mixer and added all the flour at once. I then turned on the mixer and continue to mix slowly until just combined. Finally, to chill the dough, I wrapped it in wax paper and refrigerated for an hour.

IMG_6247.jpg
IMG_6249.jpg
IMG_6250.jpg
IMG_6251.jpg
IMG_6253.jpg

Step 2: Bake the shell.

Turning the dough out onto a floured surface, I rolled it into a 1/8 inch thick circle. Draping the dough over my rolling pin, I laid it into the tart pan and gently pressed the dough into the creases. Lastly I removed the excess dough from the sides and poked the bottom of the crust several times with a fork to allow steam to escape while baking.

IMG_0382+copy.jpg
IMG_3771+copy.jpg
IMG_1964+copy.jpg

The shell was blind baked, meaning that it baked while lined with parchment paper filled with beans to weigh it down. This method ensures that the crust bakes very flat. After about 15 minutes of blind baking, I removed the beans and continued baking for another ~5 minutes until the crust was just turning golden brown.

IMG_2501+copy.jpg
IMG_5559+copy.jpg

Step 3: Make the filling

So many limes died in the making of this tart… but they definitely did not die in vain! The filling consists of butter, sugar, lime zest, lime juice and egg yolks. I ended up zesting and juicing 6 limes for this tart!

The first step was to combine the butter, half the sugar, lime zest and lime juice in a sauce pan, bringing it to a simmer. Meanwhile I whisked together the egg yolks and remaining sugar in a separate bowl. To temper the egg mixture, I gradually added about 1/3 of the hot lime mixture, stirring constantly. I then added all of this egg mixture back into the sauce pan and returned it to heat. I continued to cook the mixture until it had thickened.

IMG_7078+copy.jpg
IMG_6463+copy.jpg
IMG_3263+copy.jpg

Step 4: Fill the shell

The last and very easy step is the strain the filling into the pie shell. This removes all of the chunky zest, leaving just a smooth filling.

IMG_2081+copy.jpg
IMG_2138+copy.jpg

And there you have it!

A Zesty Lime Tart to go with your “Corona”

please everyone stay safe and follow the directions of health authorities

IMG_6269.jpg
IMG_6271.jpg

Lessons Learned:

  1. The recipe called for a 9” tart pan and all I had was a 9.5” pan. You wouldn’t think that the 0.5” would make much of a difference, but I think it did. I felt like I was really stretching the amount of crust I made and had JUST enough. In addition, I felt that the amount of filling was slightly less than there should have been to fill the tart in a way that is aesthetically pleasing. That said, the ratio of filling to crust was still quite nice.

  2. The edges of my crust weren’t quite even. If I did this again, I would take greater care as I pushed the crust into the creases to make this pattern as consistent as possible.

Looking for more Pie Day inspiration? Check out my post from last year when I made a cherry pie for Pie Day!

Until next time…

German Chocolate Brownies

Baked February 9, 2020

German Chocolate Cake was always one of my favorite items to bake when I was growing up. The sponge in this cake has a much lighter flavor and texture than other chocolate cakes and is complemented perfectly by the layers of sticky coconut and pecan. It was always tasty right when finished, but a lot tastier after spending a good amount of time chilling in the refrigerator. Even now, when I come home to visit, my dad will ask me if I can whip up a German Chocolate Cake. I’d love to say yes each time, but it is actually a somewhat ambitious cake to make! It relies on folding in egg whites rather than using a leavening agent, which is always a tricky task. You also always run the risk of accidentally making scrambled eggs as you cook the gooey topping (which I did twice in a row the first time I made the cake when I was 12 years old). Not feeling quite that ambitious this weekend to make real German Chocolate Cake, I was excited when I came across the much simpler recipe for German Chocolate Brownies recipe in the CIA book.

IMG_6180.jpg

I’m “coconuts” about German Chocolate Cake. Let’s get started!

Step 1: Make the brownies

This recipe uses melted chocolate rather than cocoa powder for the chocolate flavor. The first step is to chop the unsweetened baking chocolate into dime sized pieces so that they will more easily melt. Next, the butter is melted on the stove and then poured over the chopped chocolate. After waiting a few minutes, I stirred the chocolate / butter mixture until all chocolate had melted and was well incorporated into the butter. I set this bowl aside.

IMG_6131.jpg
IMG_6134.jpg

Next, I added eggs, sugar and salt to my stand mixer bowl. After whisking a bit to combine, I placed the bowl over simmering water and continued to whisk and slightly heat for a few minutes. I then transferred the bowl back to my stand mixer and mixed on medium speed with my whisk attachment for several minutes.

IMG_6137.jpg
IMG_6139.jpg
IMG_6140.jpg
IMG_6141.jpg

The next step is to turn down the mixer speed to low and start to add the chocolate / butter mixture. I quickly realized I had overestimated how much batter my mixer could hold, and there was no way I could add the chocolate and then the flour. Admitting defeat, I transferred the mixture to a larger bowl and continued by mixing by hand. Once the chocolate was fully incorporated into the egg mixture, I mixed in the flour. With that, the batter was ready for baking. I decided to divide my batter between a rectangular and a square cake pan.

IMG_6144.jpg
IMG_6145.JPG
IMG_6146.jpg
IMG_6147.jpg

Step 2: Make the topping

First, evaporated milk, butter, salt and brown sugar were added to a saucepan and brought to a simmer. The mixture was simmered until it slightly darkened and thickened, about 20 minutes. After taking it off the heat, I slowly mixed in egg yolks and vanilla, and then folded in toasted pecans and sweetened coconut flake.

IMG_6149.jpg
IMG_6150.jpg
IMG_6152.jpg
IMG_6154.jpg
IMG_6159.jpg
IMG_6165.jpg

Step 3: Assembly

I turned out the cooled brownies onto a tray. Once the topping was cooled to a spreadable consistency, I spread a thick layer over the top of the brownies. I then refrigerated the brownies for an hour before cutting them to allow the topping to firm up.

IMG_6177.jpg
IMG_6179.jpg

And there you have it… German Chocolate Brownies!

IMG_6185.jpg

Lessons Learned:

  1. The recipe had actually called for baking these brownies on a half sheet pan. When I finished making the batter, I got nervous that it wouldn’t fit and the brownies would be too thin. This is why I ended up baking the brownies in two separate pans. I think I should have followed the recipe as stated. Because I used smaller containers, the brownies were thicker and so had to be baked longer, drying out the edges a bit.

  2. As I mentioned in the introduction, it is SO hard to not get scrambled eggs when you add the yolks to the hot milk/butter/sugar mixture. I tried to add the yolks slowly and mix vigorously while adding. However, I still ended up with a handful of small stringy egg pieces. For the most part, the topping was ok and I was able to remove the few egg pieces that formed. Next time I may let the topping cool a bit more before trying to add the egg yolks and go even more slowly.

Until next time…


Layers of Lemon and Strawberry Cake

Baked: November 2-3, 2019

Hello, and long time no see! After a few months of many life changes, I’ve moved and am baking in a new kitchen once again! What better way to break in a new kitchen than a fun bake.

The CIA Baking and Pastry book is great because it provides instructions for assembled cakes and all the components that go into them. It’s fun to follow the instructions for these assembled cakes because they are often quite intricate and you are guaranteed to have the perfect combination of flavors and textures. However, this time around it was fun to page through the book, looking for the components to design my own assembled creation. For this bake, I combined four recipes I found in the book:

  • Lemon Cake

  • Strawberry Cake

  • Swiss Meringue Buttercream

  • Candied Lemon Slices

IMG_3642.jpg

Lemon tell ya, this cake was berry tasty!

Let’s get started…

Step 1: Make the Candied Lemon Slices

On the first day of this bake, I made the candied lemon slices. These decorations take a surprisingly long time due to various cooling and drying steps. I first sliced the lemons to roughly 1/8 inch thickness and removed any seeds. The CIA book had recommended using a meat slicer to do this, which I don’t own, so it was tough to get the lemon slices thin enough just using a sharp knife and cutting board. I then placed the slices in a small saucepan with cold water and brought slowly to a simmer. Once at a simmer, I removed the lemon slices, draining the water.

IMG_2091.jpg

Next, I combined sugar, water and corn syrup in a larger saucepan and brought to a boil. Turning down the heat to bring the syrup to just below a simmer, I added the lemon slices and and cooked for 20-30 minutes until they were almost translucent. Removing the saucepan from the heat, I let the slices cool completely to room temperature. During this time the syrup became substantially thicker.

IMG_1774.jpg

Once cooled, I arranged the lemon slices on a wire rack and allowed excess syrup to drip off them for about 20 minutes. I then transferred the slices to a baking sheet lined with a silicone baking mat and dried them in the oven for several hours at low heat.

IMG_2493.jpg
IMG_5216.jpg
IMG_1931.jpg

Step 2: Make the Lemon Cake.

The next day I made the remaining components and assembled the cake. I first creamed butter, confectioners sugar and a whole lot of lemon zest. Once a smooth texture, I gradually added egg yolks, combining fully after each addition, and set this mixture aside.

IMG_4505.jpg
IMG_1271.jpg

I next made the meringue-like mixture to fold into the lemon mixture. I whipped the egg whites until frothy and then gradually added the granulated sugar, whipping until medium peaks formed. I then folded about a third of the egg whites into the lemon mixture, combining completely before folding in the remaining egg whites.

IMG_3387.jpg
IMG_9419.jpg
IMG_3898.jpg

I had previously sifted together the dry ingredients (flour, corn starch and baking powder). I now carefully folded the dry ingredients into the the batter. Dividing the batter between two cake pans lined with butter and parchment paper, I baked the lemon cakes until a skewer inserted at the center of the cake came out clean.

IMG_1717.jpg
IMG_5178.jpg

Step 3: Make the Strawberry Cake

The strawberry cake was considerably easier to make than the lemon cake. Before beginning I first made strawberry puree by pureeing strawberries in a blender and removing seeds by passing the puree through a fine mesh.

IMG_6518.jpg
IMG_4845.jpg

To make the cake, I first warmed the eggs slightly in the microwave and whisked melted butter into the eggs. I then also slightly warmed the strawberry puree and mixed the butter-egg mixture into the puree. Lastly, this strawberry mixture was combined with sifted dry ingredients (sugar, flour and baking powder) until smooth and transferred to the prepared cake tin. The recipe originally called for a pinch of vanilla powder to be included with the dry ingredients. I only had vanilla extract and so added a few drops to the strawberry puree as a substitute.

IMG_1842.jpg
IMG_3152.jpg
IMG_5617.jpg

Step 4: Make the Swiss Meringue Buttercream frosting

I LOVE Swiss Meringue Buttercream. Compared to it’s American alternative, this buttercream has a much fluffier texture and doesn’t overwhelm your cake with a sweet, sugary taste. To make the butter cream, I put the granulated sugar and egg whites into the metal mixing bowl and briefly whisked to combine. I then set the mixing bowl over a saucepan of barely simmering water and continued to whisk until the eggs reached 165 degrees F. Once warmed, I transferred the egg whites-sugar mixture to the mixer and whisked on high speed until the whites were cooled. Adding chunks of butter a bit at a time, I continued to whip the frosting to combine. Not wanting to overwhelm the cake with vanilla flavor, I only added a touch of vanilla extract to the frosting, much less than the recipe called for. The frosting was a bit runnier than I wanted, so I refrigerated for a few minutes before whipping again with the paddle attachment prior to cake assembly.

IMG_3355.JPG
IMG_2562.JPG
IMG_2948.JPG
IMG_7011.JPG

Step 5: Assemble the cake

After chilling the sponges, I removed the caramelization and applied simple syrup before assembling the cake. Stacking the layers in the order lemon, strawberry, then lemon, I sandwiched each layer with about a cup of frosting. I then frosted the exterior of the cake with a crumb coat and chilled for a few minutes.

IMG_8415.jpg
IMG_9444.JPG
IMG_3237.JPG
IMG_4263.JPG

After applying the thicker coat of buttercream frosting, I added a decorative swirl to the top of the cake and vertical lines around the sides. Finally I inserted the candied lemon slices into small incisions on the top of the cake to complete the decoration.

IMG_0618.JPG
IMG_2451.jpg

And there you have it… a cake made of layers of strawberry and lemon sponges, butter cream frosting and candied lemon slices decoration!

IMG_8251.jpg
IMG_6736.jpg
IMG_4903.jpg

Lessons Learned:

  1. My candied lemon slices ended up with a tough texture. As I mentioned above, it was difficult to cut the lemon slices as thin as suggested, 1/8 inch. Next time I would try to get these slices as thin as possible. Luckily they were mostly just for decoration, although some did eat them!

  2. After creaming the butter, confectioners sugar and lemon zest for the lemon cake sponge, I tasted a bit of the batter. I didn’t think it was lemony enough, but wanted to follow the recipe to a T, so I didn’t add any more. Once the cake was finished, I wished I had added more zest to get a much punchier lemon taste.

  3. The lemon cake sponge ended up a bit dry and with a thick, hard caramelization on the outside suggesting I probably baked it for too long. To try to fix this, I removed a good amount of the this caramelization and coated the sponges with a lot of simple syrup. This helped, but a perfectly baked sponge would have been ideal.

  4. Those who eschew artificial food colorings will appreciate the muted colors of the sponges in this bake. However, for my taste the shade of pink of the strawberry sponge was too dark and could have used a boost from a bit of food color gel.

    Until next time…

Charlotte Russe

Baked: May 12, 2019

Photo Credit: Daniel Beauboeuf

Prepare to be shocked: I don’t watch Game of Thrones.

Let’s just say that the slightest amount of gore in film is too much for me to take. Ask any one of my friends and they will have a story of a time they saw a movie with me and I had to look away, leave the room or plug my ears. In fact, as I write this blog post I am sitting in my living room, facing away from the TV, wearing noise-canceling headphones while my husband watches the latest Game of Thrones episode.

That said, with all the hype around the last season of GoT, it got me thinking about some royal desserts. So for this challenge bake, I am making a Charlotte Russe! The Charlotte Russe was created by French chef Marie-Antoine Careme who worked for both King George IV and Czar Alexander I (thank you Wikipedia). The cake was created during his time working for Czar Alexander and was a nod to George IV’s only daughter Charlotte and his new employment in Russia. The cake consists of a filling of chocolate cake and Bavarian cream, surrounded by Lady Fingers and topped with chocolate shavings. I think it is a very pretty cake, and in fact looks a bit like a crown.

DSC_0286.jpg

Baking is fun to do on a ‘reigny’ day! Let’s get started…

There are many steps to making a Charlotte Russe cake:

  1. Make the Chocolate Sponge

  2. Make the Lady Fingers

  3. Make the Bavarian Cream and Prepare for Assembly

  4. Assemble the cake and chill

  5. Make the chocolate shavings and decorate the cake

Step 1: Make the Chocolate Sponge

The chocolate sponge for this cake is so light and fluffy, it doesn’t weigh down the cake. Despite not having any leavening agent (e.g. baking soda) in the batter, this cake rises a lot in the oven. In fact, the recipe calls for just making one 8-inch round and slicing it horizontally to create two thinner sponge layers! The key here is to really sufficiently whip your eggs and avoid knocking out the air as you fold in your flour and cocoa powder.

The first step was to sift together the flour and coca powder so they are ready for later.

DSC_0361.jpg
DSC_0370.jpg

Next, I combined the sugar and whole eggs in the metal stand mixing bowl and placed the bowl over a sauce pan of simmering water. I whisked this mixture continuously over the heat until it reached a temperature of 110 degrees F. I then immediately transferred the bowl back to the stand mixer, and whipped the eggs on high speed until the the foam reached its maximum volume. I then turned the speed down to medium and continued to whip the eggs for another 15 minutes. This prolonged whipping stabilizes the mixture. The pastel yellow color of the eggs by the time you finish whipping is so pretty.

DSC_0412.jpg
DSC_0419.jpg
DSC_0456.jpg

The next step was critical: folding in the flour and cocoa powder without knocking out air pockets. Adding a small amount of the flour/cocoa at a time, I carefully folded in the dry ingredients with a round the outside and then punch through the middle motion. The dry ingredients have a tendency to make their way to the bottom of the bowl or in small pockets. As I mixed, I kept an eye out for these pockets to avoid transferring large chunks of flour to my final product.

Start of folding…

DSC_0484.jpg
DSC_0523.jpg
DSC_0524.jpg
DSC_0525.jpg
DSC_0526.jpg

Middle of folding…

DSC_0565.jpg
DSC_0566.jpg
DSC_0567.jpg
DSC_0568.jpg
DSC_0570.jpg

Near end of folding…

DSC_0585.jpg
DSC_0586.jpg
DSC_0587.jpg
DSC_0589.jpg
DSC_0591.jpg

The last step was to add butter and vanilla to the batter. To avoid curdling, I added a small amount of the batter to the melted butter and vanilla extract mixture, mixed and then folded it back into the mixing bowl.

DSC_0474.jpg
DSC_0614.jpg
DSC_0623.jpg

Of course the very last step was to pour the batter into a greased pan lined with parchment paper before baking.

DSC_0632.jpg
DSC_0644.jpg
DSC_0645.jpg

Step 2: Make the Lady Fingers

This was the first time I ever made Lady Fingers and the first time I ever ate a Lady Finger. Honestly? … What a weird cookie. The ingredients in Lady Fingers are so simple: eggs yolks, sugar, egg whites, cake flour. There is no flavoring like vanilla extract so they taste very very simple when finished. I guess that’s why they compliment the sweet interior of a Charlotte Russe so well!

First I sifted the cake flour so it was ready for later in the recipe. Next, I whipped the egg yolks with a portion of the sugar until it thickened.

DSC_0663.jpg
DSC_0668.jpg
DSC_0682.jpg
DSC_0684.jpg

Next, I whipped the egg whites until soft peaks formed, then added the remaining sugar and continued to whip until medium peaks formed.

DSC_0688.jpg
DSC_0700.jpg
DSC_0710.jpg
DSC_0714.jpg

Next, I gently folded the egg whites into the egg yolks. Then I carefully folded the flour into the egg mixture.

DSC_0721.jpg
DSC_0730.jpg
DSC_0748.jpg
DSC_0780.jpg
DSC_0783.jpg
DSC_0824.jpg
DSC_0835.jpg

Working as quickly as I could, I filled a piping bag with the batter. Prior to starting the bake, I had prepared a baking sheet by lining it with parchment paper and marking out 3 inch lines a few inches apart. I then flipped the parchment paper over so the pen markings faced downward. This later served as my template to help achieve more uniform length of my lady fingers.

DSC_0651.jpg

After piping each lady finger, I generously dusted the entire tray with powdered sugar. I then baked the cookies until the edges turned slightly brown (admittedly I left them in the oven about 2 minutes too long!).

DSC_0862.jpg
DSC_0889.jpg
DSC_0911.jpg

Step 3: Make the Bavarian Cream and Prepare for Assembly

So I’m going to cheat a little bit. This is actually my second time making Chocolate Bavarian Cream, so I will refer you to my Peanut Butter S’mores Cake post if you are interested in a refresher of how this is made. The big risk with making Bavarian Cream is that it contains gelatin, which will set quickly as it cools. Thus it is important that prior to starting your Bavarian Cream you have prepared in advance all cakes or molds the Bavarian Cream will be applied to.

Before starting to make the Bavarian Cream, I prepped major components of the cake for assembly. The first step was to split my baked, cooled, and chilled chocolate sponge into two thin layers. First I trimmed the caramelized edges so that the edge of the cake was perfectly orthogonal to the base. Next I leveled the top of the cake and then split the cake into two pieces horizontally.

This was the first time I successfully used my cake leveler. The key is to make sure your cake is well chilled before use. The leveler will easily cut through your cake without squishing it when your cake is cold. I learned to be patient, go slowly, and really utilize the sawing motion of the serrated edge. This is a fantastic tool to achieve perfectly uniform layers to your cake.

DSC_0932.jpg
DSC_0937.jpg
DSC_0945.jpg
DSC_0946.jpg
DSC_0949.jpg
DSC_0951.jpg

Next I placed an 8-inch cake mold on a cake board and lined it with acetate. The goal is to provide support to the cake during assembly and then remove after the cream has set. I then placed the first layer of sponge at the bottom of the mold and applied simple syrup to keep it moist during assembly. I also applied simple syrup to the other slice of sponge to keep it moist.

DSC_0918.jpg
DSC_0954.jpg
DSC_0967.jpg
DSC_0975.jpg

The last step is to line the outside of the cake with Lady Fingers. Recall that earlier I removed the caramelized edges of the cake. This allowed for about a 1 cm gap between the cake and the side of the mold to allow for the placement of the lady fingers. This was a tough process and the lady fingers kind of wanted to flop over. The process that worked the best was to slot them in across from each other so that there was pressure at their base from wedging between the cake and the mold.

DSC_0977.jpg
DSC_0984.jpg
DSC_0987.jpg

Step 4: Assemble the cake and chill

Before I walk through the cake assembly, I want to show you these beautiful photos of the chocolate Bavarian cream. The last step of making the cream is to fold the chocolate sauce containing gelatin into whipped cream. The chocolate swirls while mixing are just so pretty and the outcome is this beautiful shade of light brown.

DSC_0114.jpg
DSC_0121.jpg
DSC_0128.jpg

Now that the Bavarian cream was ready, I started to assemble the rest of the cake. First I applied roughly half of the Bavarian cream to the top of the sponge inside the mold and spread it evenly.

DSC_0130.jpg
DSC_0134.jpg

Next I inserted the second sponge into the mold on top of the first layer of Bavarian cream. This was really tricky since the lady fingers were leaning inwards. I did end up breaking one of the lady fingers as I wiggled the sponge into place, but luckily when later the Bavarian cream set it held the broken lady finger upright!

DSC_0138.jpg
DSC_0139.jpg

Lastly, I spread the remaining Bavarian cream on top of the sponge. I then put the cake in the refrigerator to chill and allow the Bavarian cream to set.

DSC_0145.jpg
DSC_0157.jpg

Step 5: Make the chocolate shavings and decorate the cake

The top of the cake is decorated with dark and white chocolate shavings. To make the shavings, I placed a sharp knife orthogonal to a large block of chocolate and made a quick sweeping motion. This was repeated several times for both types of chocolate.

DSC_0169.jpg
DSC_0171.jpg
DSC_0173.jpg
DSC_0184.jpg

The final step is to decorate the top of the cake with the chocolate shavings. In order to get a clean line between the two types of chocolate, I placed a 4 inch cake mold in the center of the cake. I then filled the inside of the mold with white chocolate shavings and the gap between the mold and the lady fingers with the dark chocolate shavings. The mold then easily lifted out to leave the finished cake.

DSC_0250.jpg
DSC_0261.jpg

And there we have it. A Charlotte Russe!

DSC_0287.jpg
DSC_0293.jpg

Lessons Learned:

  1. I didn’t quite follow the recipe - I messed up. I was supposed to have the bottom layer of Bavarian cream be chocolate and the top layer of Bavarian cream be vanilla. When I made the sauce to combine with the cream, I was supposed to split it before adding the chocolate to half, effectively making vanilla sauce and chocolate sauce. I messed up, adding chocolate to all of the sauce. Rather than waste it, I decided to just make both layers chocolate and call it a day! Who doesn’t want more chocolate?

  2. If you look at the slice of cake above you will notice that the top layer of Bavarian cream is much thicker than the bottom layer. I eyeballed splitting the Bavarian cream in half but it would have been better to weigh the cream to make sure I evenly applied the two layers.

Until next time…

Cherry Pie

Baked: March 17th, 2019

Photo Credit: Daniel Beauboeuf

2019 is flying by and I can’t believe it is already late March! Pi Day really crept up on me this year, so I didn’t even get a chance to bake a pie until the weekend after Pi Day! For anyone reading who hasn’t heard of “Pi Day,” it is March 14th (3.14) in honor of the numerical value, Pi.

PI.png

3.1415926535897932384626433832795028841971693993751058209749445923078164062862089986280348253421170679821480865132823066470938446095505822317253594081284811174502841027019385211055596446229489549303819644288109756659334461284756482337867831652712019091456485669234603486104543266482133936072602491412737245870066063155881748815209209628292540917153643678925903600113305305488204665213841469519415116094330572703657595919530921861173819326117931051185480744623799627495673518857527248912279381830119491298336733624406566430860213949463952247371907021798609437027705392171762931767523846748184676694051320005681271452635608277857713427577896091736371787214684409012249534301465495853710507922796892589235420199561121290219608640344181598136297747713099605187072113499999983729780499510597317328160963185950244594553469083026425223…

… I could go on (literally) but I won’t. In fact, Pi is an irrational number, meaning that its digits will go on forever. Those who are computationally inclined have worked tirelessly to identify additional digits of Pi. This year on Pi Day, Google Japan employee Emma Haruka Iwao broke the previous record of 22 trillion digits to calculate Pi to 31 trillion digits! Let’s be real for a minute - she didn’t have to use a slide rule to do this calculation. According to this article in Fortune, using Google’s cloud computing service, this calculation required 25 virtual machines, 170 TB of data (yes that’s terabytes), and 121 days.

Lucky for me, I can bake a pie in just one day. And so I did.

DSC_0229.jpg

Baking “occu-pies” my mind. Let’s get started. 

Step 1: Make the pie crust dough

I decided to make the pie crust dough first so that it could chill in the fridge while I later made the cherry filling. Pie crust dough is made of very simple ingredients: flour, salt, butter and water.

I first added the flour and salt to my stand mixer, fitted with the paddle attachment, and stirred on medium speed to combine. I then added chunks of butter, one at a time, continuing to stir on medium speed. Once small nuggets of butter about 0.5 inches in size had formed, I poured in all of the cold water at once. I continued stirring until the dough had just started to come together.

DSC_0902.jpg
DSC_0913.jpg
DSC_0921.jpg

Turning the dough out onto a slightly floured surface, I continued to work the dough very briefly to bring it together into a ball. I then wrapped it tightly with plastic wrap and refrigerated for over an hour.

DSC_0925.jpg
DSC_0937.jpg
DSC_0938.jpg

Step 2: Make the filling

DSC_0791.jpg

While my pie crust dough was chilling, I made the cherry filling. The filling calls for cherry juice, sugar, salt, clear gel starch, cherries, lemon juice and butter. The book notes that a good way to acquire the cherries and cherry juice is to purchase a can of cherries in juice (not the thick pie filling kind) and separate using a colander. Cherries in juice, not the thick pie filling, was remarkable hard to find and I ended up ordering these Oregon Red Tart Cherries online.

The first step is to combine most of the cherry juice and sugar in a saucepan over medium heat and bring to a boil. In the meantime, I combined the clear gel starch and a small amount of remaining cherry juice to dissolve.

DSC_0811.jpg
DSC_0815.jpg
DSC_0830.jpg

Next, I slowly added the cherry juice / clear gel solution to the boiling cherry juice, continuously stirring throughout. I continued to heat this solution until it became thickened and clear.

DSC_0846.jpg
DSC_0848.jpg
DSC_0856.jpg
DSC_0864.jpg

I next added the butter and lemon juice, and then gently folded in the cherries. I left the filling mixture to cool completely in the fridge.

DSC_0868.jpg
DSC_0881.jpg
DSC_0892.jpg

Step 3: Roll out your dough and assemble

This version of cherry pie completely covers the top of the pie rather than creating a lattice top. The ball of dough that has been chilling will be used for both the base and the top of our pie, so the first step is to cut it roughly in half. Rolling out just one of the two pieces of dough on a lightly floured surface, I alternated the direction of the rolling pin frequently in order to create an even distribution of dough. I also frequently flipped or rotated the dough. Moving or flipping the dough frequently keeps the dough from sticking to your surface and decreases the amount of additional flour that is required. I continued to roll out the dough until it was about 1/8 inch thick.

DSC_0958.jpg
DSC_0963.jpg
DSC_0967.jpg
DSC_0972.jpg
DSC_1009.jpg

Picking up the rolled dough with the rolling pin to avoid tearing, I gently laid the dough over the pie dish. Lifting the edges of the dough as I worked my way around, I gently pushed the dough up against the sides of the dish. I then added and evenly distributed the now cool cherry pie filling.

DSC_1011.jpg
DSC_1013.jpg
DSC_1017.jpg
DSC_1036.jpg

I next rolled out the second half of the dough in a similar fashion in preparation for assembling the rest of the pie. Before placing the second piece of rolled dough on top of the pie, I made an egg wash of whipped egg and whole milk and coated the edges of the pie where the two pieces of dough would eventually meet. Gently placing the top onto the pie, I pressed down at the edges to seal the pie with the egg wash.

DSC_0035.jpg
DSC_0049.jpg
DSC_0073.jpg
DSC_0084.jpg

Once the edges were sealed, I used a sharp knife to trim the excess dough. I then crimped the dough around the outside of the pie by pushing it into the indent created by my thumb and middle fingers.

DSC_0098.jpg
DSC_0124.jpg

To create a nice golden browning effect, I egg washed the top and edges of the pie. After waiting three minutes for the egg wash to mostly absorb, I applied a second coat of egg wash.

DSC_0150.jpg
DSC_0152.jpg

Last but not least, I cut four vents in the center of the pie to allow for the release of steam while baking. Then the pie went into the oven until it was nicely golden brown out the outside.

DSC_0181.jpg
DSC_0186.jpg

And there you have it. A simply scrumptious cherry pie to celebrate 31 trillion digits!

DSC_0199.jpg
DSC_0214.jpg

Lessons Learned:

  1. For this recipe, I used red tart cherries. The pie was definitely not as sweet as some other pies. I preferred this but for some taste buds, dark sweet cherries would have been more appropriate.

  2. Some bakers will add large granules of sugar on top of the pie after the egg wash before baking to add some sweetness. Especially in combination with the tart cherries, I would likely try this next time as a nice way to balance the tartness.

  3. A few of the edges of my pie crust caught and so I likely could have kept it in the oven for a shorter period of time. I was worried about the dreaded “soggy bottom” and so decided to keep the pie in the oven until the full 45 minutes suggested by the recipe. It indeed did not suffer from a soggy bottom!

Until next time…

Peanut Butter S'mores Cake

Baked on December 2, 2018

As the holidays approach, you may be thinking I should blog about my favorite holiday recipes. Don’t get me wrong… there will be plenty of holiday cookies in my life this year, including the Cieslewicz family favorite, Melting Moments. In fact, as I write this blog post I am waiting for my Melting Moments dough to chill before rolling it out.

However, living in California makes it REALLY hard to get in the Christmas spirit. It feels fundamentally wrong that it could be 60 degrees in December… that we could easily head outside and grill up a brat or go for a balmy hike. Every time I see Californians wearing scarves, gloves and mittens in 60 degree weather, I grimace. Can you really be that cold? 

So then, what is a more appropriate California Christmas bake than something you’d associate with a summer vacation in the midwest? S’mores of course!

Baking this Chocolate Peanut Butter S’mores cake was by far my most ambitious bake to date. This cake is made up of six components, five of which I had never made before.

  1. Graham cracker crust

  2. Chocolate Peanut Butter Gianduja

  3. Flourless Chocolate Sponge

  4. Chocolate Bavarian Cream

  5. Marshmallow

  6. Milk Chocolate Glaze

On first glance, the recipe in the CIA book looks simple. “Layer these components… apply the Bavarian cream…” However, you quickly realize that each component is its own recipe with additional sub-recipes. To make the Bavarian cream, I needed to also make vanilla sauce! Prior to starting this cake, I looked through each recipe in detail and wrote out on paper the order in which I should make the components so they were ready at the proper time for assembly. I also made a diagram of the cake assembly to make sure each piece wound up in the right place. Both of these documents were key and kept me on track during this 11 hour marathon bake (don’t worry… there was a 6 hour chill period in the middle).

IMG_4013.JPG

The holidays can be stressful, but you “butter” just “mallow” out. Come bake with me and spread “s’more” holiday cheer!

Step 1: Make the Flourless Chocolate Sponge

This flourless sponge recipe calls for egg yolks, salt, vanilla extract, egg whites, sugar and Dutch-process cocoa powder. The mass of the egg yolks and whites needed to be in equal proportion in the recipe, but an egg is about 1/3 yolk and 2/3 white. This took careful separation and weighing to get just right. Furthermore, you will notice that in addition to no flour, there is also no leavening agent like baking powder or soda. The rise in this sponge comes from air beaten into the whites and yolks separately and so it was important to take care to not knock out any air while mixing components together.

IMG_3899.JPG

The first step was to basically make a meringue by whipping the egg whites while slowly adding the sugar until stiff peaks formed. I then needed to set these egg whites aside while I whipped together other ingredients. I only have one mixing bowl for my stand mixer and so I needed to transfer these egg whites to another bowl in order to continue the recipe. This made me extremely nervous about knocking out air pockets in the whites while I transferred them to another bowl. Having a second bowl for my stand mixer would have been ideal (wink wink to a particular husband who may be reading this and is looking for Christmas gift ideas…).

IMG_3900.JPG
IMG_3901.JPG

After cleaning out my bowl and whisk attachment, I whipped together the egg yolks, vanilla and salt until the color of the yolks turned a more pale yellow. I then gently mixed about 1/3 of the egg whites into the egg yolks until fully incorporated before gently folding in the rest of the egg whites. The last step was to fold in the cocoa powder, which had been sifted. Every time I think of folding, I can’t help but have Julia Child’s voice enter my head on repeat with each stroke: “Through the middle, and round the outside!” When I felt the dough was thoroughly mixed with no chunks of egg white left, I spread the dough on a full sized sheet pan lined with parchment paper. I baked the cake until it just sprung back when pressed in the middle.

IMG_3902.JPG
IMG_3903.JPG
IMG_3904.JPG
IMG_3905.JPG

Step 2: Make the Chocolate Peanut Butter Gianduja

What is Gianduja? Before making this cake, I had never heard the term used. It is an Italian word describing a chocolate paste that is about 30% hazelnut paste. In fact, the famous chocolate spread, Nutella, was originally called Pasta Gianduja before it was reformulated to be so spreadable. For this cake, the main components of Peanut Butter Gianduja should be pretty predictable based on the name: Melted Milk Chocolate and Creamy Peanut Butter. The third ingredient is a small amount of trimoline, sometimes also called invert sugar, which is a very very sticky and dense sugar syrup.

Making the gianduja was quite straight forward. Using two double boilers, I separately melted the milk chocolate chunks and warmed the peanut butter. When both were smooth, I combined them and then added the trimoline. After throughly combined, I transferred the gianduja to a tupperware container and set aside. This chocolate peanut butter paste was so tasty! We continued to eat it for days spread on graham crackers.

IMG_3906.JPG
IMG_3907.JPG
IMG_3908.JPG
IMG_3930.JPG

Step 3: Make the Graham Cracker Crust

This recipe originally called for me to make a very traditional graham cracker crust consisting of graham cracker crumbs, light brown sugar and butter pressed into a 6” mold and baked. I’ve made this type of crust before in pies and cheesecakes. In fact, my favorite recipe, Grandma’s cheesecake, calls for a modified version using granulated sugar instead of brown sugar. However, pies and cheesecake have the luxury of their pie plate and springform pan to maintain the shape of the crust during baking, with the filing then helping the crust to hold its shape while eaten. Given the amount of assembly required for this s’mores cake, I was worried from the start about the structural integrity of this graham cracker crust, and I was right. After making the crust once, it would simply crumble when handled. There was no way it would make a nice layer inside the assembled cake.

Starting over, I made the same recipe again, but this time added an egg yolk and a bit of the egg white until the crumbs came together and could hold their shape in a ball. I then pressed the crumb mixture evenly into a 6” mold. I used the flat side of a meat tenderizer to get a flatter surface on the crust. After baking for about 10-15 minutes until it seemed cooked through, I cut a circle of a smaller diameter while it was still warm and then removed the mold and these trimmed edges. It will become clear a bit later why I needed the disc of graham cracker crust to be slightly smaller than the mold.

IMG_3923.JPG
IMG_3924.JPG
IMG_3926.JPG
IMG_3927.JPG

Step 4: Make the Marshmallow Ring and Marshmallow Drops

The forth layer of this cake is a disc of marshmallow, requiring me to make marshmallow fluff, pipe it into a ring and the then freeze for 20 minutes to set its shape. This marshmallow recipe called for granulated gelatin, granulated sugar, glucose syrup, honey, and vanilla extract.

The first step is to make a sugar syrup consisting of the granulated sugar, glucose syrup (basically a non-flavored corn syrup), honey and water. I stirred these ingredients in a saucepan over high heat, bringing them to a boil. I let the syrup continue to cook without stirring until it reached 252 degrees F and then removed from the heat.

IMG_3915.JPG
IMG_3916.JPG

While the sugar syrup cooled, I bloomed the gelatin in water and then melted it in a double boiler. Off the heat, I mixed the vanilla extract into the gelatin. When the sugar syrup reached 210 degrees F, I added the gelatin / vanilla mixture and began to whip the mixture on the stand mixer. I continued to whip until medium peaks formed.

IMG_3919.JPG
IMG_3921.JPG

While the marshmallow was whipping, I traced a 6” circle onto the backside of a piece of parchment paper for a template and then sprayed the front of the parchment paper with some cooking spray to prevent sticking. I then filled a piping bag fitted with a large round tip with the marshmallow fluff and piped a disc just slightly smaller than the 6” circle. I also piped a couple swirly blobs of marshmallow I planned to use later for cake decorations. This tray then went into the freezer until I was ready for cake assembly.

IMG_3921.JPG
IMG_3922.JPG
IMG_3945.JPG

Step 5: Assemble the Graham Cracker Crust, Gianduja and Cake Layer

The graham cracker crust, gianduja and flourless cake layers are assembled together outside of the cake mold so that they can later be pressed all at once together into the mold.

The first step was to spread the gianduja onto the graham cracker crust. I then used the cake mold to cut out a 6” round of the flourless chocolate cake. Similar to the graham cracker crust, this was then trimmed to a diameter slightly less than 6” before being pressed on top of of the gianduja layer. I set this assembled stack aside while I moved on to making the Bavarian cream.

IMG_3930.JPG
IMG_3931.JPG
IMG_3932.JPG

Step 6: Make the Chocolate Bavarian Cream

The Bavarian cream will ultimately fill in the space between two layers and the edges of the cake when applied inside the 6” cake mold. Gelatin and chilling helps to stabilize the cream so that it holds its shape. Because the cream contains gelatin, it was important to have everything ready to go to fill the cake before starting to make the cream. In addition to the assembly of the graham / gianduja / cake stack, this preparation included setting the 6” mold on a sheet pan atop a sheet of acetate.

To make the Chocolate Bavarian Cream, the first step was to whip the cream into soft peaks, cover and set aside in the fridge for a later step. Next, I made the vanilla sauce with added melted chocolate. The vanilla sauce calls for milk, heavy cream, salt, sugar, egg yolks and vanilla extract. I first combined the milk, cream, salt and a portion of the sugar in a saucepan and brought them to a boil, stirring. Meanwhile, in a separate bowl (not over heat) I blended the egg yolks and remaining sugar with a whisk.

IMG_3933.JPG
IMG_3934.JPG

I tempered the egg yolks by adding about 1/3 of the hot milk mixture to the egg mixture and whisking, before then adding the egg / milk mixture back to the milk mixture and cooking until it could coat the back of my spoon. While the sauce cooled, I passed it through a sieve to remove any lumps and then mixed in the vanilla. I then added about 1/3 of the sauce to melted chocolate, mixed and then added back to the rest of the vanilla sauce to completely combine.

IMG_3936.JPG
IMG_3937.JPG
IMG_3938.JPG
IMG_3939.JPG

I next bloomed sheets of gelatin in water, squeezed out any excess water and melted the gelatin over a double boiler. While the vanilla/chocolate sauce was still warm, I added the gelatin to the vanilla sauce and then passed the sauce through a sieve once more to remove any chunks of gelatin. I mixed 1/3 of this vanilla / chocolate / gelatin mixture into the reserved whipped cream, and then folded in the remaining sauce to complete the Chocolate Bavarian Cream. With all of my components ready, it was now time to quickly assemble the cake into the mold before the gelatin set too much in the cream.

IMG_3944.JPG

Step 7: Fill the Cake Mold

If you recall the diagram I created for myself at the start, the assembly of this cake is as follows:

  1. Layer half of the Chocolate Bavarian Cream into the bottom of the cake mold.

  2. Sprinkle the top of marshmallow round with graham cracker crumbs and press the round (crumbs side down) into the layer of Bavarian cream. Allow the Bavarian cream to come up the sides of the marshmallow round.

  3. Layer the remaining Bavarian cream into the mold, making sure the layer is even.

  4. Press the graham / gianduja / sponge sandwich sponge side down into the Bavarian cream. Keep pushing with even pressure as the Bavarian cream comes up the sides of the sandwich.

IMG_3946.JPG
IMG_3947.JPG
IMG_3948.JPG
IMG_3949.JPG
IMG_3955.JPG
IMG_3958.JPG
IMG_3963.JPG
IMG_3968.JPG

From here the cake went into the freezer for 6 hours to firm up. You will notice that the graham cracker crust is elevated above the top of the mold. As I pushed down I felt like I was starting to meet too much resistance and I worried about cracking the graham cracker crust. However, you will notice later when the cake is sliced that the layer of Bavarian cream inside the cake is pretty thick, so I probably could have gotten away with making it more flush with the top of the mold. This would have made the cake more aesthetically pleasing, but the cake also worked out this way too.

- - CHILL at least 6 hours - -

Step 8: Make and Apply the Chocolate Glaze

The milk chocolate glaze calls for gelatin, milk, glucose syrup, chopped milk chocolate and pate a glacer, blonde. Pate a glacer is a compound chocolate that doesn’t need to be tempered and can help give your chocolate glaze a glossy sheen. To make the chocolate glaze, I first bloomed the sheets of gelatin in water. I then mixed the milk and glucose syrup together, bringing them to a boil. After squeezing out the excess water, I melted the gelatin in the hot milk and glucose liquid. I then poured the hot milk / glucose / gelatin mixture over the chocolates and stirred until the chocolates melted. While the recipe did not call for it, I did pass this chocolate mixture through a sieve because I felt the gelatin had left a few lumps.

With the chocolate glaze cooling to a useable temperature, I removed the cake from the freezer. I flipped the cake over so that the graham cracker crust was on the bottom and placed the cake on a cooling rack set inside a sheet pan. I applied a dishcloth dampened with hot water to the outside of the mold in order to slightly warm the sides of the cake so that the mold could be removed. The acetate that was formerly on the bottom side of the cake was also removed. With the mold now removed from the frozen cake, you will see the purpose of making the internal layers slightly smaller in diameter than the mold. This allowed the Bavarian cream to completely envelop the layers in the mold, so that when unmolded the entire exterior of the cake is clean, sharp lines of Bavarian cream.

IMG_3976.JPG
IMG_3977.JPG

When the chocolate had cooled to 85 degrees F it was now ready to be glazed onto the cake. Starting in the middle of the cake, I worked by way around in circles to allow glaze to pour down the sides of the cake. I then popped the cake in the fridge for about an hour for the glaze to firm up before transferring it to a cake board and allowing to refrigerate overnight.

IMG_3980.JPG
IMG_3981.JPG
IMG_3982.JPG
IMG_3991.JPG

To finish off the cake, I placed four marshmallow swirls dusted with graham cracker crumbs on top of the cake… by far the easiest step!

IMG_4006.JPG
IMG_4016.JPG
IMG_4017.JPG

Lessons learned:

  1. When making the sponge, my beaten egg whites were a tad too stiff. When folding them into the egg yolk mixture, it left some chunks of egg white that were difficult to incorporate. Next time, I will try to beat my eggs just to soft peaks.

  2. Even after time in the freezer, my marshmallows still remained a bit more like fluff than solid marshmallows. Reading up more on this topic, I learned that the longer you beat the marshmallow the more hard and chewy they will be. Some also even add egg whites into the mixture to give the marshmallows more internal structure and a fluffier consistency.

  3. This marshmallow recipe called for the use of honey. When completed, I felt the marshmallows tasted too strongly of honey. The peanut butter and chocolate tastes of the cake were too strong for me to notice the honey when the full cake was assembled, but if I were to make marshmallows again for other uses I would look for a recipe that doesn’t use honey. I would have preferred a really strong vanilla flavor.

  4. You probably noticed that many items went through a sieve multiple times to remove lumps. A key item I will remember next time is that each time you filter your sauce, you will loose a little bit. It’s important to plan ahead and make more than you will need.

  5. For the marshmallow ring, the recipe originally called for dusting the marshmallow with the graham cracker crumbs before it chills in the freezer. I completely forgot this step. However, my marshmallows (as mentioned in #2) were still pretty sticky after coming out of the freezer and so application of the crumbs at that time still worked. I would imagine that if I repeated the cake in the future with a more chewy marshmallow this may not be the case.

  6. I briefly touched on the height of the cake in my description above. It definitely would have looked prettier had I kept pushing the graham / gianduja / sponge layer further into the Bavarian cream.

  7. Overall, I think the layers look pretty good for my first attempt. However, I do notice some inconsistencies like the marshmallow being wider than the other layers or the gianduja being spread thinner in the center. As I practice more, I hope to become more consistent with layering.

  8. When pouring the glaze over the cake, setting the cake on the cooling rack worked pretty well. However, when I removed it from the rack the glaze did pull a way from the cake in a few places. Another technique I’ve seen is to put the cake on top of a circular cake pan or other object that is slightly narrower in diameter than the cake. That way when the glaze flows down the sides, it is not contacting both the cake and the surface it sides on at the same time.

  9. My chocolate glaze appears to have many more air bubbles than I liked. To get that really pretty glossy look, it should be air bubble free! I looked a bit more into this and read a few recommendations to use an immersion blender on the melted chocolate to make it really smooth. It is recommended to keep the blender fully submerged in the chocolate in order to avoid air bubbles. It is also recommended to pass the chocolate back through a sieve afterwards as well.

    - Until next time -

Soft Pretzels

Baked on September 29, 2018

If I were Oprah and had my own Weight Watchers commercial, I don’t think I would yell, “I… LOVE… BREAD!” …. I would most definitely yell “I… LOVE… PRETZELS!” Now yes, I understand that pretzels are really just a type of bread. But to me, the texture of the dough and crust combined with the super salty exterior make the perfect combination of textures and tastes. My love of pretzels has truly been life long. I remember taking a trip to Germany with my family when I was 8 years old. In Munich there were food carts everywhere, with huge 1.5 foot diameter pretzels hanging from wooden rods. My parents indulged me… to an extent, but if I had it my way, I would have had a pretzel every day I was in Germany.

IMG_3558.jpeg

No plot “twist” here! You know what’s coming next. Let’s start making some pretzels before I “as-salt” you with more puns!

The first step of course was to make the dough. I first mixed the flour and dry active yeast together in one bowl, and the water, butter, salt and malt syrup in the mixing bowl. I then added the flour/yeast mixture to the water mixture and started beating slowly with the dough hook attachment. I quickly discovered that the amount of dough I was making (enough for 12 pretzels) was too much for my mixer to handle. Once I felt like the dough was mostly combined, I split it in two for its remaining timing beating with the dough hook. These two rounds, covered loosely with plastic wrap, proofed on the c0untertop for about 30 minutes. The recipe called for about 15 minutes or until roughly doubled in size. I suspect my kitchen was a tad cold and the rounds needed the extra time to grow.

Before proofing

Before proofing

After proofing

After proofing

Next the rounds needed to be cut into 12 equal pieces, about 160 grams each. In order to be somewhat precise I used my scale. It was a good thing because my skills at eyeballing were terrible! I achieved about eight pieces that are of only one cut, and the remaining four peices, in order to make twelve all together, were made up of chunks of dough pressed back together. Though you do want to avoid piecing chunks of dough back together, I was able, in the next step, to do so successfully and I didn’t notice anything different about the end result.

IMG_3516.jpeg
IMG_3517.jpeg

Next these twelve equal pieces needed to be pre-shaped into oblongs before rolled into thin rods. You may notice in the photo of the chunks of dough that there are sharp edges where the rounded and proofed dough was sliced into pieces. These cuts broke the internal structure of gluten strands that had been built up through kneading, exposing the pockets of air that had been captured during proofing. Because this dough will again undergo a second round of proofing, the external protective structure of gluten strands needed to be recreated through pre-shaping.

The first step to pre-shape the dough, is to the line up the long end of the piece a dough to be parallel with the edge of the countertop. I then folded the dough in half along this long edge and used the heal of my hand to close the seam.

IMG_3525.jpeg
IMG_3528.jpeg
IMG_3529.jpeg

Next I rotated the dough 90 degrees and folded if over along its short edge. Again, I used the heal of my hand to seal the seam.

IMG_3530.jpeg
IMG_3531.jpeg
IMG_3532.jpeg

To form small spheres of dough, I then grabbed this piece of dough, short seam side down, in my fist. A quick digression: they must write this baking book for men because the directions said that for dough this size, both the heal of my hand and the top of my fingers up to my first knuckle should be touching the countertop. My hands are nowhere near big enough for that so for me it was really the tips of my fingers just barely touching the bench. To shape the dough, the book then describes a twisting motion where your fingers rotate to your right while the heal of your hand twists down and to the left. This motion is repeated until the piece of dough is rounded into a smooth ball. I really struggled with this motion and watched a lot of youtube videos to try to get it right. For the last few rotations on each ball I cheated and used both hands to get the perfect circular shape. Clearly I have a lot practicing ahead on this technique.

IMG_3534.jpeg
IMG_3536.jpeg

Now that I had twelve nice and neat balls of dough, it was time to roll them out and twist into a pretzel shape. I first stretched the dough, not flattened, into a rectangle about 10 inches long. Next I folded the dough twice like a letter going into an envelope. First I folded the top third of the dough lengthwise down towards the bottom third and lightly tapped with my fingers. I then took what was now the top portion of the dough lengthwise and folded it over to the bottom. I again used the heal of my hand to close the seam.

IMG_3537.jpeg
IMG_3538.jpeg
IMG_3539.jpeg

Next, starting with the seam side down on the bench, I used the palms of my hands to roll out the dough to about 30 inches long and slightly thicker in the middle. Once the dough was approaching 30 inches in length, the dough had a tendency to swing back and forth like a jump rope in the middle when I was rolling the dough at the edges of the rod. The dough was quite elastic and kept trying to retract when I would finish rolling it out.

IMG_3542.jpeg

With the long rod of dough rolled out, it was time to twist into the pretzel shape. I first created an upside down U shape on the bench. Holding the dough by the ends, one in each hand, I crossed the right end over the left end once, leaving about eight inches of dough left on each side below the cross. I repeated this motion again to create an additional twist in the dough. Then I picked up each end and move it upwards towards the top of the former U shape, placed the ends at about 2 and 10 o’clock, and pushed down with my index fingers to seal the dough in place.

IMG_3543.jpeg
IMG_3544.jpeg
IMG_3545.jpeg

After rolling out and twisting up all twelve pretzels, they then sat to proof covered at room temperature for about 30 minutes followed by proofing in the refrigerator uncovered for about 20 minutes. The uncovered proofing in the fridge allowed the dough to form a slight skin.

IMG_3547.jpeg

While the pretzels were proofing, I started preparing the lye for dipping and coating the pretzels. Lye is a sodium hydroxide solution which has a very high pH. Dipping the pretzels briefly in a lye solution changes the chemistry of the surface of the dough by accelerating what are called Maillard reactions. These are reactions between between amino acids and reducing sugars in the dough that cause browning.

Lye is pretty toxic so it was time to get my PPE (Personal Protective Equipment) on. After a few near misses in grad school contributed to driving me from the lab, I have to say I was pretty freaked out making the lye. I was wishing for a chemical hood to mix the solution. But after watching several youtube videos where no one died making lye, I mixed the solution. Later that night, as I cleaned up, I wasn’t sure where to keep the package of sodium hydroxide pellets. I finally decided it would probably be ok in the cabinet with my other baking materials as long as the package was inside a tupperware container. My husband made fun of me for this; my grad school training was coming back to haunt me as I searched for appropriate “secondary containment” for the pellets.

IMG_3505.JPG
IMG_3548.jpeg
IMG_3549.jpeg

A few minutes before dipping the the pretzels in the lye, I pulled them out of the fridge to warm up. The lye solution was made by boiling water and then adding the sodium hydroxide pellets, so warming up the pretzels a bit prevented the temperature of the lye solution from dropping too quickly during pretzel dipping. For each pretzel, I used a spider to dip the pretzels into the lye. Removing the pretzels from the lye, I placed them on a rack suspended over my sink to allow excess lye to drip off. I also immediately sprinkled each pretzel with coarse salt. Each pretzel was transferred to a baking sheet lined with lightly oiled parchment paper and baked for ~15 minutes until a dark brown color had formed.

IMG_3551.jpeg
IMG_3552.jpeg

And there we have it! Twelve soft pretzels! If you look at the image below, you’ll notice that the pretzels get lighter in color from left to right. The three on the left were those first to be dipped in lye and the six on the right were the last. I can think of two reasons why the pretzels on the left may be lighter. First, as I got towards the end of the batch of pretzels, the level of lye in my saucepan was lower and thus I may not have fully coated the last few pretzels. Alternatively, the pretzels on the left sat longer between being dipped in lye and baked, perhaps giving more time for the reaction to proceed.

IMG_3554.jpeg
IMG_3565.jpeg
IMG_3569.jpeg

Lessons learned:

  1. In the book’s photos of the pretzels, they had much wider gaps in the middle. This is likely due to how thin the dough was at the ends of the rod before twisting into the pretzel shape. I struggled to get the dough this thin on the ends due to the elasticity of dough shrinking the rod over time. Researching this after I finished baking, I learned that some people roll out the dough as much as they can, then wait 5-10 minutes to allow the dough to relax. This relaxation allows the dough to then roll even thinner on a second attempt. Personally, I think you could go either way with the thickness of dough. It would have looked nice to have those larger holes, but I love a thicker, doughier pretzel myself!

  2. If you look back at the images of dough being twisted into the pretzel shape, you’ll notice that the end of the dough on the left side after the second twist comes up shorter than the right side. In retrospect, I think I would have started with a longer amount of dough on the left side so that after two twists (cross to the right side, then back to the left side), the length of the dough would have come out more even. This would likely have resulted in more symmetrical pretzels. You’ll noticed that almost all of mine skew to one side.

  3. The recipe didn’t describe how long to leave the pretzels in the lye during dipping, so I really just left them in long enough to get mostly covered, maybe just a few seconds. Researching this online after finishing baking, I saw some recipes that called for the pretzel to be in the lye for 30 seconds. If I had left the pretzels in the lye for longer I suspect I would have achieved a darker brown color.

    Until next time…

Lemon Meringue Pie

Baked on September 8, 2018

I have a confession. This week I became a lemon torturer. Making lemon meringue pie this weekend, I chopped, squeezed and zested five lemons. Though their life came to a brutal end, I'd like to believe they knew their life had purpose. What better purpose than pie?

I'd say baking gives me purpose... or at least a "zest" for life! So let's "squeeze" the day and start baking!

Lemon Meringue Pie is assembled in three steps. First you bake the pie shell, then make the lemon filling to fill the pie shell, and lastly top off the pie with meringue. To make the dough for the crust, I first combined the flour and salt until well mixed. Next, I added chunks of butter to the flour mixture and mixed until there were still ~2cm sized chunks of butter in the course mixture. These remaining small chunks of butter will allow for a flakier consistency of the crust. While still mixing, I added all of the water in one pour and continued mixing briefly as the dough came together. Turning the dough out onto a lightly flowered surface, I formed a ball, tightly wrapped it in plastic wrap and refrigerated the dough for one hour.

Next, I rolled the dough out onto a lightly floured surface. In reading about pie doughs for this bake, I learned that bread flour actually works best for lightly flouring a surface. Due the lower starch content, it is less likely to clump up and introduce large spots of flour into your dough. The dough was already pretty malleable, so it was easy to roll out to about 1/8 inch thickness.

I next folded the rolled out dough over my rolling pin to gingerly lay it onto the pie dish, gently easing the dough up the the sides of the dish. I then trimmed any excess dough from the edges and used two index fingers to crimp the dough at the rim.

Next I blind baked the pie shell so that it is fully cooked and crispy before any lemon filling is added. Blind baking is the method of baking the shell without filling in the presence of heavy baking beads or dried beans. To do this, I lined the prepared pie shell with parchment paper and then filled it with the heavy beans. I then baked the shell with the beans to weigh down the dough so it maintained its shape in the dish. The tricky part of blind baking is knowing when the crust is done. When I pulled the dish out of the oven and removed the beans, I discovered that the center of the dough was not yet finished and I put it back in the oven for about ten minutes without the beans.

Now that the the pie crust was done, it was on to the lemon filling! I first mixed lemon juice, lemon zest, granulated sugar and water in a saucepan and brought it to a boil. In the meantime, I mixed sugar and cornstarch into egg yolks and water in a separate bowl. Once the lemon juice mixture was boiling, I poured about a third into the egg yolk mixture to temper it, and then added the egg yolk / lemon mixture back into the lemon juice mixture in the saucepan. I brought this mixture to a boil while stirring until the mixture thickened. I then stirred in a small amount of butter. This lemon mixture was then immediately poured into the cooled pie shell to set.

So why does cornstarch, when heated in a mixture, cause a sauce to gel? The strands of starch actual begin to absorb water in the mixture. When heated, the water molecules are moving more quickly, causing disruption of the starch molecules, allowing them to absorb even more water. As the starch begins to restrict more water, it forms a gel. Once cooling off the stove, the sauce tends to gel further as the starch structures stabilize into a form that is more permanently restricting the water.

Now that we've got our lemon filling, what's lemon meringue pie without the meringue on top? In the final step, I whipped the eggs and sugar until glossy and forming stiff peaks in the bowl. Then loading a piping bag fitted with a star tip, I piped rosettes onto the surface of the cooled lemon filling. The whole pie then went into the oven for a few minutes, allowing the edges of the meringue to develop a golden brown look.

And we're done! The pie turned out super well. Usually my husband takes these bakes in to work with him... but honestly... it didn’t make it to work with him this time!!

Although this pie turned out super yummy, there were a few things I learned:

  1. There are a few methods of blind baking. Some people will only bake the shell in the presence of the beans or weights for the first 10 minutes and then remove the weights for the remainder of the baking. This may have sped up my baking time and allowed the rim of my crust to stay a bit more tender rather than crispy from spending too long in the oven.

  2. My meringue ended up shrinking away from the edges and left moisture on top of the lemon filling. After reading a bit online about this, I learned the phenomenon is called "weeping." As I learned, weeping of the meringue can happen for a handful of reasons. However, in my case it was definitely due to spending too much time in the oven at the last step. The recipe said it would only need ~3 minutes in the oven, but since the pie wasn't turning a pretty golden brown, I left it in for much longer. Other suggestions I read include 1) using super fine sugar so that it dissolves better in the egg while whipping, 2) preparing the meringue ahead of time so that you can apply it while the lemon filling is still hot and can help 'bake' the meringue, or 3) only baking the pie on low humidity days.

Until next time . . .